

Sushi Go Party! Strategy: How to Win More Games
Sashimi loses more games than it wins. That’s the first thing to internalize about Sushi Go Party!, and it’s counterintuitive because 10 points is the biggest single number in most menus. The players who win consistently are the ones taking small guaranteed points while everyone else chases the flashy set — plus one denial play nobody notices.
Some links below are Amazon affiliate links — as an Amazon Associate, King Panda Games earns from qualifying purchases at no extra cost to you. Full disclosure.
The Sashimi Trap
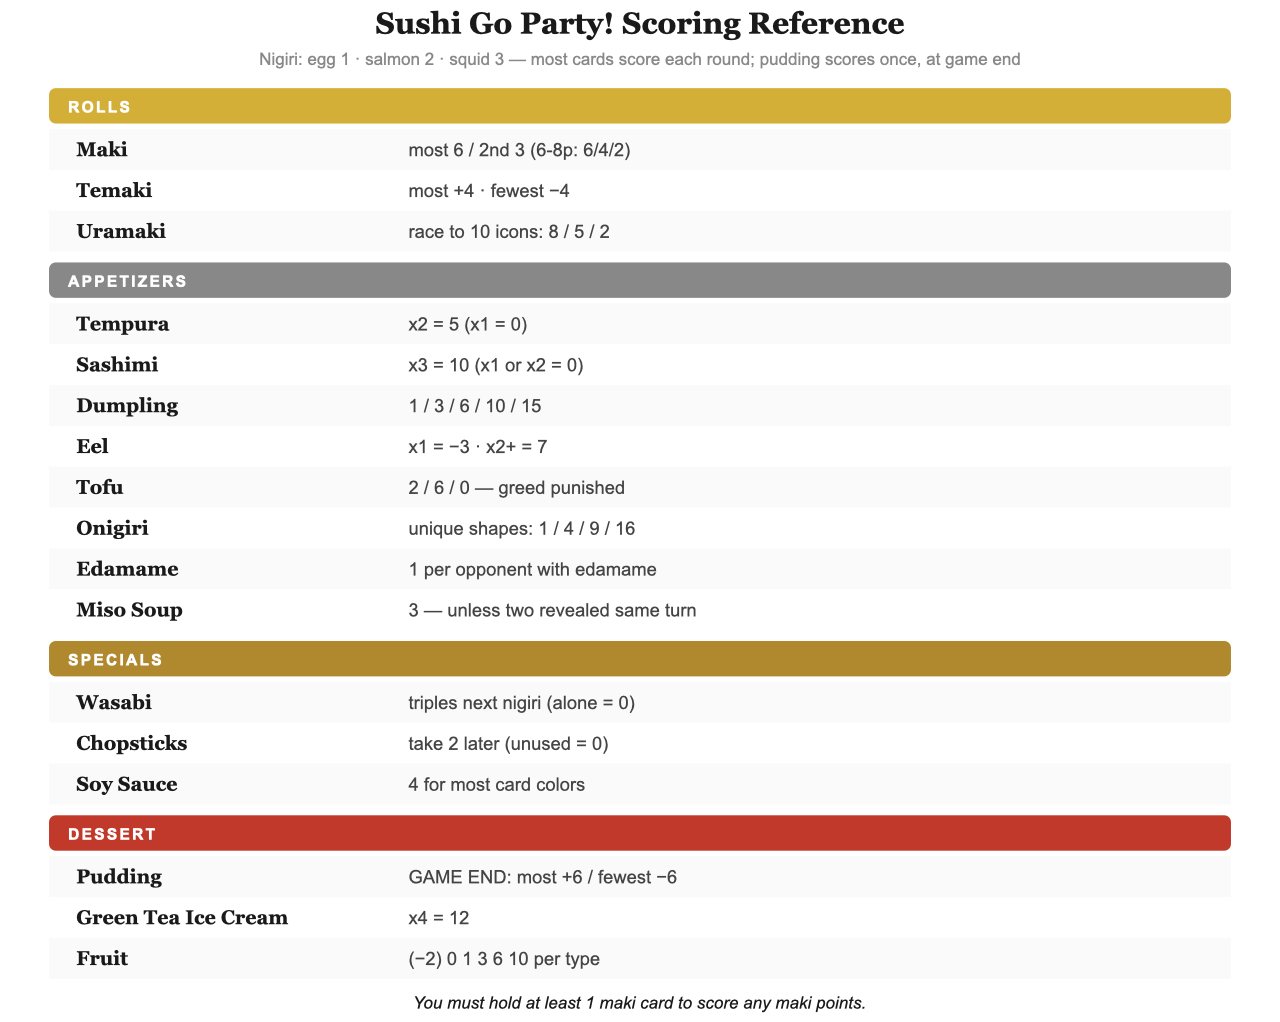
Sashimi pays 10 points for three cards and zero for one or two. That’s the whole problem: two-thirds of the way to a great score is worth exactly nothing.
Compare that to dumplings, which pay 1, 3, 6, 10, then 15 as you collect them. Every dumpling improves your score immediately. Every sashimi is a bet that two more will survive the pass.
The rule: only take your first sashimi if you can see at least two more in the current hand rotation. Taking one on faith is how good players end rounds with zero.
The exception is late in a round when someone else already holds two — then a sashimi is worth taking purely to deny them, because you’re converting their 10 points into their 0.
Count the Pudding From Round One
Pudding is the only card scored at the end of the entire game, not per round: most pudding scores +6, fewest scores −6. That’s a twelve-point swing in a game frequently decided by five.
Nobody drafts pudding in round one because it does nothing yet. Then round three arrives and three players simultaneously realize they have zero, and the pudding cards become the most contested things on the table.
End of round two. You have one pudding, two opponents have two each, and one has none. Everyone’s watching the maki race. Quietly take pudding whenever it costs you less than three points elsewhere — you’re not trying to win the +6, you’re trying to avoid the −6, and that’s a much cheaper goal.
Hate-Draft When You’re Out of the Race
When should you take a card you can’t score?
When it’s worth more to someone else than the card you’d otherwise take is worth to you. Maki is the classic case: it pays 6 to the leader and 3 to second place (6/4/2 in 6–8 player games), and only the top finishers score anything at all. Those bigger counts only exist in the deluxe box — the original tin stops at five players.
If you’re clearly third in maki, your maki cards are worth zero. Taking one anyway, purely to keep the leader from extending, converts a dead card into a six-point swing against them.
What most players do: draft only what scores for them, treating every other card as noise.
What actually works: in the last few passes of a round, ask what the player to your left needs. Hands shrink as a round progresses, so late denial costs almost nothing — you’re giving up a 1-point card to erase someone’s 6.
Play Chopsticks Early
An unused chopsticks card scores zero. It’s the most commonly wasted card in the game, because players hold it waiting for a perfect double-take that never materializes.
Chopsticks let you take two cards from one hand on a later turn, returning the chopsticks to the hand you pass. Their value depends entirely on there still being good pairs circulating — which means their value drops every single pass.
Use them the moment you see two cards you genuinely want in the same hand. “Good enough now” beats “perfect never.”
Match Your Strategy to the Menu
The menu changes what’s correct, which is why generic advice fails here. A few reliable adjustments:
- If uramaki is in play, treat it as a race, not a collection — first to 10 icons scores 8, then 5, then 2, and arriving fourth pays nothing.
- If temaki is in play, remember the fewest gets −4; you don’t need to win it, you need to not lose it.
- If special order is in play (2–6 players), it copies any card you’ve already played — which makes committing to one strong set safer than usual.
- If the menu is dessert-heavy, pudding contention starts earlier and matters more.
That’s the whole reason menu selection deserves its own guide — the strategy is downstream of the dishes.
For the exact point values behind all of this, our scoring reference lists every dish, and our full review covers whether the game belongs on your shelf. The official Gamewright rules PDF is free if you need to settle an argument mid-game.
Don’t own Sushi Go Party! yet? This guide assumes the base game.
Check Sushi Go Party! price on Amazon →
Frequently Asked Questions
What is the best strategy in Sushi Go Party!?
Take reliable scaling points like dumplings over high-variance sets like sashimi, track pudding from round one to avoid the −6 penalty, and hate-draft maki once you’re out of the running for it. Consistent small points beat occasional big ones.
Is sashimi worth it in Sushi Go Party!?
Only when you can see a path to three cards. Sashimi scores 10 for three and zero for one or two, so a partial set is completely wasted drafting. Take your first one only if more are visible in the current rotation.
When should you hate-draft in Sushi Go Party!?
Late in a round when hands are small and you can see what the player to your left needs. Denying a maki leader costs you a low-value card and can swing six points, which is usually a better trade than the card you’d otherwise take.
How important is pudding in Sushi Go Party!?
Very — it’s a twelve-point swing. Pudding scores only at the end of the entire game, with +6 for the most and −6 for the fewest, so ignoring it for two rounds and panicking in round three is the most common way players lose.
When should you use chopsticks in Sushi Go Party!?
As soon as you see two cards you want in the same hand. An unused chopsticks card is worth zero points, and its value drops with every pass as hands shrink and good pairs disappear.
Does the menu change the best strategy?
Completely. Uramaki rewards racing to ten icons fast, temaki punishes having the fewest, and special order rewards committing to one strong set. Read the menu tiles before the first hand is dealt and adjust accordingly.
Do this in your next game: before round one, look at the dessert on the menu and decide how many you need. That single habit fixes the most expensive mistake most players make.