

How to Win at Wingspan: Strategy Guide for Beginners
Most people lose their first three games of Wingspan for the same reason: they play birds they can afford, collect a little food, lay a few eggs, and wonder why the person across the table is somehow generating resources on every single turn — including turns that aren’t theirs.
Some links below are Amazon affiliate links — as an Amazon Associate, King Panda Games earns from qualifying purchases at no extra cost to you. Full disclosure.
This guide covers the five strategic habits that make the difference. None of them require memorizing all 170 bird cards. They work from your first competitive game onward.
If you’re still deciding whether Wingspan is worth buying, check out our full Wingspan review first.
If Wingspan sticks at your table, we ranked the best Wingspan expansions.
Your Bonus Card Decides What You’re Building
Pick your bonus card before you play your first bird. Then build your tableau around it.
This sounds obvious, but most beginners do it in reverse — they play whatever birds they can afford in round 1, check their bonus card mid-game, and realize they’ve built the wrong engine. By then, it’s too late to pivot without wasting your remaining action cubes.
Not sure which bonus card is actually strong? our full bonus card tier list ranks all of them.
Your bonus card is your win condition. If your bonus card rewards birds in a single habitat, specialize. If it rewards birds with specific food costs, filter every card you draw against that requirement. If it rewards birds with tucking powers, prioritize pink and brown birds that tuck from the start.
The rule: look at your bonus card before you place a single bird. Every bird decision should move you toward it, not away from it.
A good bonus card can be worth 8–13 points at end game — sometimes more. That’s a decisive scoring margin. A player who ignores their bonus card and scores 4 points from it loses to a player who built toward theirs and scores 11, regardless of how beautiful their tableau looks.
Chain Building: Why Depth Beats Spread
“More birds feels like more progress.”
It isn’t. Not in Wingspan. This is the most common mistake new players make and the most important one to unlearn.
When you activate a habitat row, every bird in that row fires from right to left. A row with 5 birds generates 5 separate power activations plus your base action. A row with 2 birds generates 2. The math isn’t linear — a 5-bird row doesn’t just do 2.5× the work of a 2-bird row, it does 5× the work per action cube.
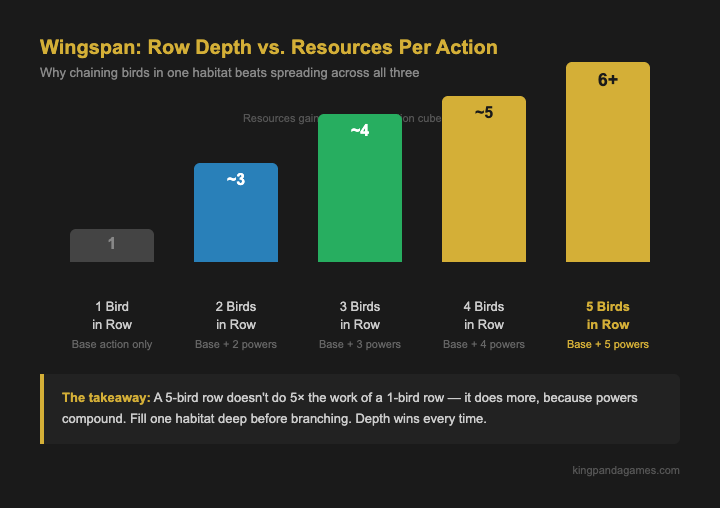
What most players do: Spread birds across all three habitats to have “flexibility,” placing 2–3 birds in Forest, 2–3 in Grassland, 2–3 in Wetland. Everything gets a little, nothing fires well.
What actually works: Fill one habitat to 4–5 birds before branching. That first deep row becomes your engine — it generates the food, eggs, and cards that fund everything else. Spread after your engine is running, not before.
Which habitat to go deep in depends on your bonus card and your opening hand. Grassland (eggs) is the most versatile primary habitat — eggs are needed to play birds in expensive columns and to score most round-end goals. Forest (food) and Wetland (cards) support an egg-laying engine and a card-drawing engine respectively, and most strong mid-game pivots flow from one of those two.
Pink Powers: Income You Didn’t Spend an Action On
The players who consistently win at Wingspan tend to share one habit: they prioritize pink-power birds early.
Pink powers activate once between your turns — meaning every time an opponent takes an action, your pink birds potentially generate food, cards, eggs, or tucked cards. At 3 players with 8 action cubes each in round 1, there are 16 opponent turns happening around you. A player with three pink-power birds running is earning passive income on every single one of those turns.
It’s round 2. You have a pink-power Finch that gives you 1 card every time any opponent lays eggs. Your left opponent lays eggs — you draw a card. Your right opponent lays eggs — you draw another card. By the time your turn comes back around, you’ve drawn 2 cards without spending a single action cube. Over a 4-round game, that kind of passive income compounds into a significant resource advantage.
Not all pink powers are equal. The best ones trigger off common opponent actions (laying eggs, gaining food, drawing cards) and give you resources you actually need. Avoid pink powers that only trigger on rare actions or that generate resources you can’t use.
The strategic implication: when you’re evaluating two similarly costed birds, the one with a pink power is almost always the better pick — even if its habitat isn’t your primary focus.
How to Read Round-End Goals
Most players check round-end goals when scoring. The players who win check them at the start of each round.
Round-end goals tell you what to prioritize in that round. If round 2 scores for eggs in nests, you should spend more action cubes laying eggs in round 2 — even if playing a bird feels more productive. If round 3 scores for birds in a single habitat, don’t spread into a second habitat that round even if you have the resources.
The scoring tiers for most goals are roughly: 1 point for meeting the minimum, 2 points for middle, 4 points for leading. The difference between 1 and 4 points across four rounds is 12 points — often the entire margin of a Wingspan game.
- At the start of each round, read the goal tile before placing your first action cube.
- Identify what the goal rewards (eggs, birds in habitat, nest types, food stored).
- Adjust your first 1–2 action cube placements for that round to build toward the goal.
- Don’t abandon your engine entirely — just tilt your priorities.
Worth knowing: The player who scores 4 points on three consecutive round-end goals is often winning on goals alone, even with a mediocre tableau. Round-end goals are not bonus points — they’re a primary scoring category that deserves primary strategic attention.
The Birdfeeder Rule Nobody Teaches You
This rule is in the rulebook, easy to miss, and costs new players food every game.
When you take the Gain Food action, you select dice from the birdfeeder one at a time. You can reroll the birdfeeder between selections.
Most new players take all available dice before rerolling. That’s the wrong order. If you need wheat and only berries are showing, take a berry first — that berry die is now out of the feeder. Then reroll the remaining dice in the birdfeeder before selecting again. You get a second chance at the food you actually need, and you still keep the berry you already took.
Over a game, this rule can mean 2–4 additional food tokens for players who use it correctly. Over 4 rounds with 8–6 action cubes, that’s a meaningful resource difference that directly affects how many birds you can play — and when the feeder still refuses to show the food you need, that’s the friction nectar smooths out, the wild food that arrives with the Oceania expansion.
The same applies when you have a bird that lets you discard a bird card to gain an extra die from the feeder: take your free dice first, decide whether you like the remaining options, and then decide whether to discard the card for a bonus die.
Check Wingspan: Oceania price on Amazon →
Frequently Asked Questions
What is the best strategy for Wingspan?
Choose your bonus card first and build every bird decision around it. Then prioritize pink-power birds that generate resources between your turns, and chain birds in a single habitat rather than spreading thinly across all three. These three habits separate consistent Wingspan winners from players who struggle despite knowing the rules.
What is the best habitat to focus on in Wingspan?
There’s no universally best habitat, but the Grassland (egg-laying) is the most underrated by new players. Eggs are needed to play birds and score end-of-round goals — a strong grassland engine supports everything else. Most winning strategies build deep in one habitat rather than spreading evenly across all three.
How important are pink powers in Wingspan?
Extremely important. Pink powers generate resources on your opponents’ turns, essentially giving you income you didn’t spend an action to earn. A player with three strong pink-power birds accumulates a meaningful resource advantage over the course of four rounds, often without other players noticing until the final score.
Should I go wide or deep in Wingspan?
Go deep in one habitat, then expand. Chaining 5–6 birds in a single habitat creates exponentially more value per action than spreading 2 birds across all three rows. Once your primary habitat is generating strong chains, branch into a second habitat to diversify your scoring and round-goal coverage.
What is the best starting hand in Wingspan?
The best starting hand has at least one bird that matches your bonus card’s requirements and at least one pink-power bird. Beyond that, prioritize birds in a single habitat over birds scattered across all three. A focused starting hand with 3 birds in the same habitat is stronger than 5 birds that have nothing in common.
When should I cache food vs. use it to play birds?
Use food to play birds in the early and mid game — your priority is getting the engine running. Cache food only when a bird’s caching power triggers naturally as part of your engine chain. Don’t hold food back speculatively; an unplayed bird that chains your whole habitat is worth far more than a cached food token worth 1 point.
How do round-end goals affect Wingspan strategy?
Round-end goals should inform what you build, not just what you score. At the start of each round, check what the goal rewards and adjust your priorities for that round. If round 2 scores for eggs in nests, that’s your signal to lay eggs rather than play new birds — even if playing a bird feels like more progress.
Build your bonus card. Fill one habitat deep. Collect pink powers like they’re free money — because between turns, they essentially are. That’s the engine that wins Wingspan consistently.